最近的工作都要操作Docker,无论是在家里还是在公司,已经不用集成环境了,而且Docker还是部署在测试服务器上,本地只写代码,然后部署运行。早期我用过PHPStudy和Laragon,但后面需要操作的项目有点多,渐渐不能满足需求了,比如本地有的项目不支持php7以上版本,有的不能支持mysql8,或者想测试项目能不能在php8运行,如果用集成环境不是很方便,不能同时运行其它版本的应用。加上现在微服务很流行,微服务必须在容器下运行,建议开发者还是要学习一下容器技术,目前最流行的是Docker。
在Docker中运行Hello World
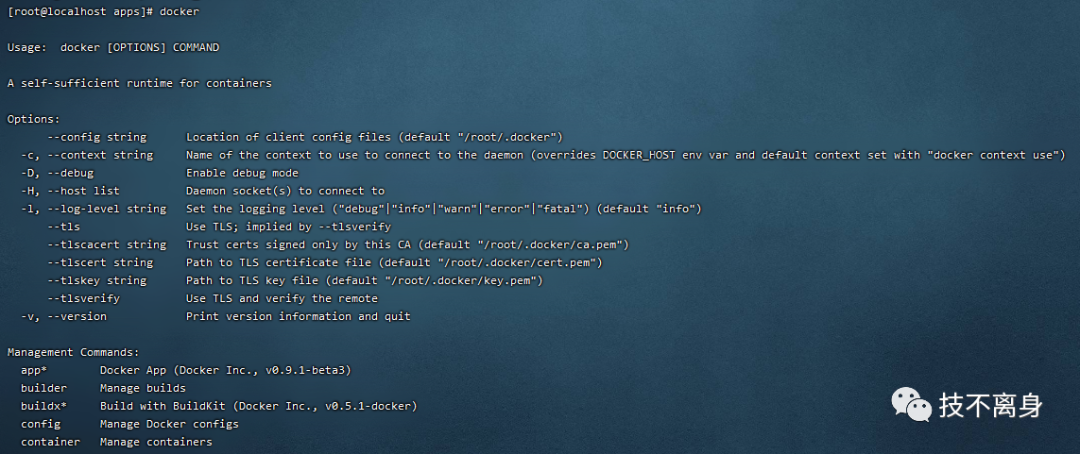
假设你已经安装好了Docker,直接运行 docker 命令可以显示使用方法,如下所示:

启动一个容器运行 docker run 命令,现在启动一个 hello world 容器。
docker run busybox echo hello world如果本地有busybox镜像,就直接用本地的镜像启动容器,否则就从公开的registry仓库将镜像下载到本地再启动容器。其中 echo hello world 表示在容器内运行的命令, 运行容器成功后就成功打印 hello world。容器运行后就停止了,需要运行 docker ps -a 才能看到刚刚创建的容器,包括容器的ID、镜像、名称以及运行的命令。

如果要启动交互式容器,即容器可以实现终端会话功能,需要在启动容器的时候加上-t 和 -i 参数,比如启动一个 ubuntu 容器,并运行 /bin/bash :

启动成功后就可以得到root权限的会员,提示符也显示了这个容器的 ID ,一旦退出终端,该容器就会停止运行。
以后台方式运行Docker容器
直接在启动容器的命令加上 -d 就能在后台运行。现在启动简单的基于Python的HTTP服务器:
docker run -d -p 1234:1234 python:2.7 python -m SimpleHTTPServer 1234启动成功后运行 docker ps 命令可看到该容器:

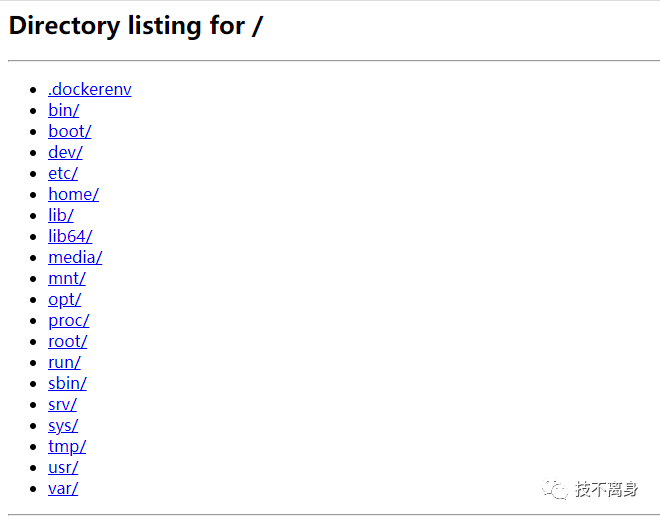
此时在浏览器访问容器所在的IP以及1234端口,会看到该容器根目录下所有文件列表:

要再次进入到该容器,只需要执行 exec 命令启动一个 base shell。
docker exec -it fa209d6cdaa9 /bin/bash使用Dockerfile构建镜像
Dockerfile是一个文本文件,记述了构建镜像所需要的过程,包括安装软件包、创建文件夹、定义环境变量以及其它操作。
作为一个简单的例子,现在基于busybox镜像创建一个新镜像,并定义一个环境变量。在一个空文件下创建一个名为Dockerfile的文件,并输入以下内容:
FROM busybox
ENV foo=bar
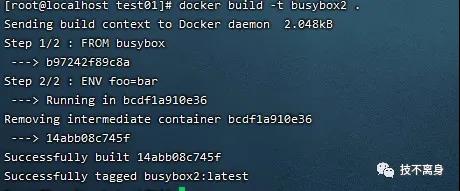
保存后运行 docker build 就可以构建新镜像。

运行 docker images 可以看到刚刚创建的镜像,现在基于这个镜像启动一个容器并打印环境变量foo:

在单一容器中使用Supervisor运行WordPress
要在单一容器里正常运行WordPress服务,就需要同时运行MySQL和HTTPD服务。由于Docker运行的是前台进程,所以需要使用Supervisor来监控并运行MySQL和HTTPD。Supervisor不是一个init系统,而是一个用来控制多个进程的普通程序。下面的supervisord.conf的配置信息等下需要用到的:
[supervisord]
nodaemon=true

[program:mysqld]
command=/usr/bin/mysqld_safe
autostart=true
autorestart=true
user=root

[program:httpd]
command=/bin/bash -c "rm -rf /run/httpd/* && /usr/sbin/apachectl -D FOREGROUN在一个空文件夹分别新建Dockerfile、supervisord.conf和wp-config.php文件,其中supervisord.conf就是上面配置的内容,wp-config.php的内容如下:
<?php
/**
 * The base configurations of the WordPress.
 *
 * This file has the following configurations: MySQL settings, Table Prefix,
 * Secret Keys, and ABSPATH. You can find more information by visiting
 * {@link http://codex.wordpress.org/Editing_wp-config.php Editing wp-config.php}
 * Codex page. You can get the MySQL settings from your web host.
 *
 * This file is used by the wp-config.php creation script during the
 * installation. You don't have to use the web site, you can just copy this file
 * to "wp-config.php" and fill in the values.
 *
 * @package WordPress
 */

// ** MySQL settings - You can get this info from your web host ** //
/** The name of the database for WordPress */
define('DB_NAME', 'wordpress');

/** MySQL database username */
define('DB_USER', 'root');

/** MySQL database password */
define('DB_PASSWORD', 'root');

/** MySQL hostname */
define('DB_HOST', 'localhost');

/** Database Charset to use in creating database tables. */
define('DB_CHARSET', 'utf8');

/** The Database Collate type. Don't change this if in doubt. */
define('DB_COLLATE', '');

/**#@+
 * Authentication Unique Keys and Salts.
 *
 * Change these to different unique phrases!
 * You can generate these using the {@link https://api.wordpress.org/secret-key/1.1/salt/ WordPress.org secret-key service}
 * You can change these at any point in time to invalidate all existing cookies. This will force all users to have to log in again.
 *
 * @since 2.6.0
 */
define('AUTH_KEY',         'put your unique phrase here');
define('SECURE_AUTH_KEY',  'put your unique phrase here');
define('LOGGED_IN_KEY',    'put your unique phrase here');
define('NONCE_KEY',        'put your unique phrase here');
define('AUTH_SALT',        'put your unique phrase here');
define('SECURE_AUTH_SALT', 'put your unique phrase here');
define('LOGGED_IN_SALT',   'put your unique phrase here');
define('NONCE_SALT',       'put your unique phrase here');

/**#@-*/

/**
 * WordPress Database Table prefix.
 *
 * You can have multiple installations in one database if you give each a unique
 * prefix. Only numbers, letters, and underscores please!
 */
$table_prefix  = 'wp_';

/**
 * For developers: WordPress debugging mode.
 *
 * Change this to true to enable the display of notices during development.
 * It is strongly recommended that plugin and theme developers use WP_DEBUG
 * in their development environments.
 */
define('WP_DEBUG', false);

/* That's all, stop editing! Happy blogging. */

/** Absolute path to the WordPress directory. */
if ( !defined('ABSPATH') )
  define('ABSPATH', dirname(__FILE__) . '/');

/** Sets up WordPress vars and included files. */
require_once(ABSPATH . 'wp-settings.php');Dockerfile要定义MySQL、Apache2(即 httpd)、PHP以及最新版WordPres的构建过程,MySQL用户名为root,密码为root,数据库名为wordpress,Dockerfile内容如下:
FROM ubuntu:14.04

RUN apt-get update && apt-get -y install \
    apache2 \
    php5 \
    php5-mysql \
    supervisor \
    wget

RUN echo 'mysql-server mysql-server/root_password password root' | debconf-set-selections && \
    echo 'mysql-server mysql-server/root_password_again password root' | debconf-set-selections

RUN apt-get install -qqy mysql-server

RUN wget http://wordpress.org/latest.tar.gz && \
    tar xzvf latest.tar.gz && \
    cp -R ./wordpress/* /var/www/html && \
    rm /var/www/html/index.html

RUN (/usr/bin/mysqld_safe &); sleep 5; mysqladmin -u root -proot create wordpress

COPY wp-config.php /var/www/html/wp-config.php
COPY supervisord.conf /etc/supervisor/conf.d/supervisord.conf

EXPOSE 80

CMD ["/usr/bin/supervisord"]
然后分别运行下面的命令,就可以启动 wordpress 容器了:
docker build -t  wordpress .
docker run -d -P wordpress
使用两个链接在一起的容器运行WordPress
MySQL 和 WordPress 不建议在同一个容器上运行,现在分别启动两个容器,然后通过 --link 选项链接在一起。
docker pull wordpress
docker pull mysql
docker run --name mysqlwp -e MYSQL_ROOT_PASSWORD=wordpressdocker -d mysql
docker run --name wordpress --link mysqlwp:mysql -P -d wordpress运行MySQL容器可以通过配置环境变量来设置mysql的密码,启动wordpress的 --link 选项表示将名为mysqlwp容器的ip映射到本容器的mysql这个host_name上,启动成功后可以进入wordpress容器,查看/etc/hosts这个配置文件。

可以看到,只要在该容器访问mysql或mysqlwp虚拟域名,就能访问mysql容器。
备份在容器中运行的数据库
要让容器里的MySQL实现持久化存储,可以通过以下两种方式实现:
- 将
Docker主机上的卷挂载到MySQL容器中 - 使用
docker exec命令执行mysqldump
第一种方式是工作中经常使用到的,如果MySQL容器删除了,数据库文件还是保存在宿主机上,下次要启动新容器,直接挂载就能正常使用了,只需要在启动容器时加上 -v 选项,比如启动MySQL容器可以用以下命令:
docker run --name mysqlwp -e MYSQL_ROOT_PASSWORD=wordpressdocker -d -v /home/docker/mysql:/var/lib/mysql mysql第二种方式相对来说比较少用,因为如果容器不小心被删除了,那就无法实现备份,该命令是在容器内执行 mysqldump 命令,如:
docker exec mysqlwp mysqldump --all-databases --password=wordpressdocker > wordpress.backup在容器之间共享数据
上述中的 -v 选项将宿主机指定的数据卷挂载到运行中的容器上,如果要让其它容器挂载同一个数据卷,只需要执行相同的挂载操作。但这样不是很方便,实际工作中是让Docker去负责管理卷,并且遵循了单一职责原则。
创建一个数据容器很简单,就是在使用 -v 这个选项上,省略了宿主机中的路径,只设置在容器要挂载的路径即可,以下做简单的演示:
docker run -it -v /cookbook ubuntu /bin/bash

root@6a2e3331a3ac:~# touch /cookbook/foobar
root@6a2e3331a3ac:~# ls /cookbook/
foobar
root@6a2e3331a3ac:~# exit
exit

[root@localhost backup]# docker inspect -f {{.Mounts}} 6a2e3331a3ac
[{volume fd9b48079a46c122ded0f77b1f570e54fada377ca01686bc77a0abec213482a0 /var/lib/docker/volumes/fd9b48079a46c122ded0f77b1f570e54fada377ca01686bc77a0abec213482a0/_data /cookbook local  true }]
这个容器启动后,Docker会创建/cookbook目录。在容器中,可以对这个目录进行读写操作。退出容器之后,运行 docker inspect 命令可查看这个数据卷被保存到了宿主机的具体位置。为了将这个容器中的卷共享给其它容器,可以使用 --volumes-from 选项,如下所示:
docker run -v /data --name data ubuntu
[root@localhost ~]# docker ps
CONTAINER ID   IMAGE     COMMAND   CREATED   STATUS    PORTS     NAMES
[root@localhost ~]#

docker run -it  --volumes-from data ubuntu /bin/bash

root@c86afb06266e:/# touch /data/foobar
root@c86afb06266e:/# exit
exit

[root@localhost ~]# docker inspect -f {{.Mounts}} data
[{volume 2ce1353b74325c24eed43d99771c2646a9af47d0b3f071ea7996bda5e1bed60b /var/lib/docker/volumes/2ce1353b74325c24eed43d99771c2646a9af47d0b3f071ea7996bda5e1bed60b/_data /data local  true }]

[root@localhost _data]# ls /var/lib/docker/volumes/2ce1353b74325c24eed43d99771c2646a9af47d0b3f071ea7996bda5e1bed60b/_data
foobar
数据卷容器并没有处于运行状态,但是它的卷映射关系还是存在的。可以通过 docker rum -v data 命令来删除容器和它的卷,如果没有 -v 选项,那系统中就会遗留很多没有被使用过的卷,白白浪费了磁盘空间。
